Read SAS output tables

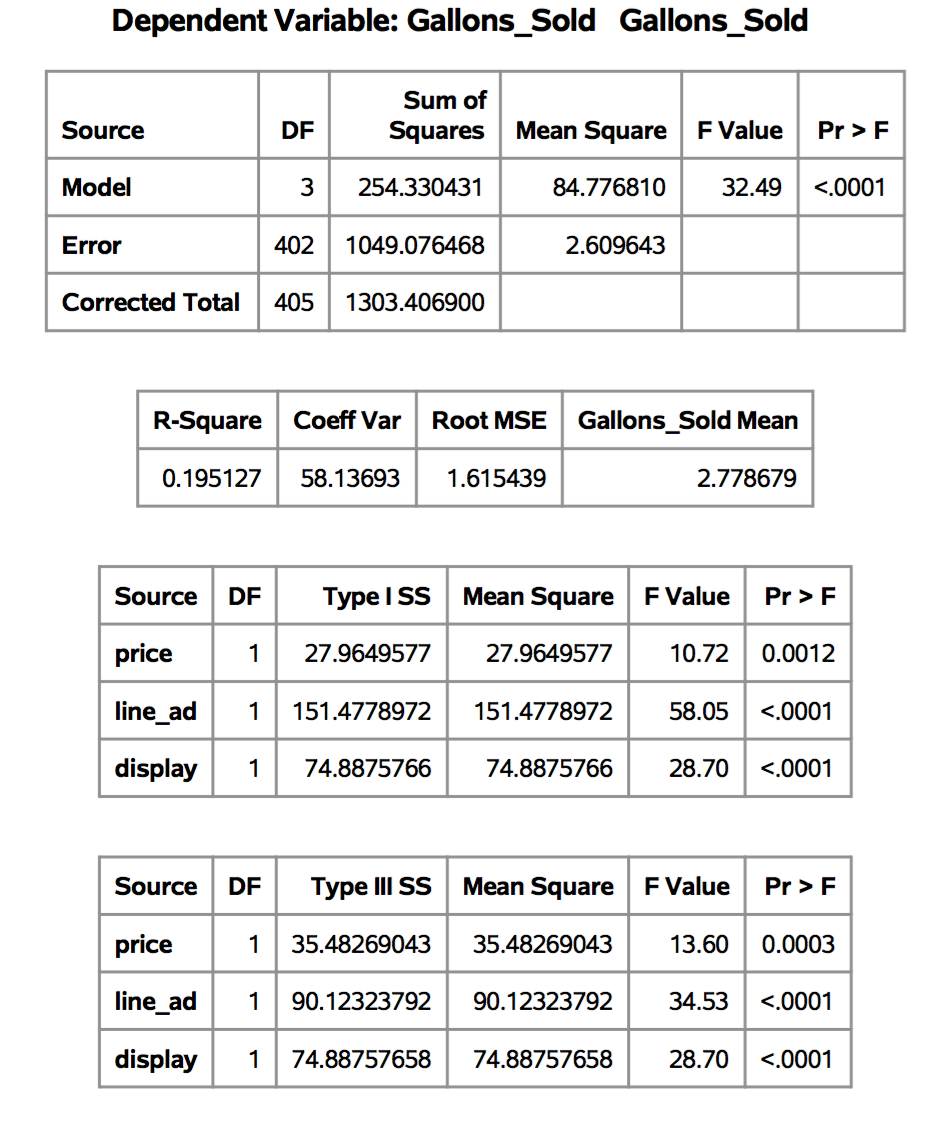
The following tables were generated right after a simple linear regression with three independent variables was fit in SAS:

Screen Shot 2016-09-03 at 9.21.25 PM

The linear regression is Gallons_sold ~ price + line_ad + display.

I will mainly illustrate how to read the first table. To give you a background, the number of samples is $latex n=406$ and the number of independent variables is 3. We set $latex p=4$ as the number of independent variables plus 1 which denotes the intercept term. 

The first row of the first table:

The sum square of model is defined as: $latex SSM=\sum\limits_{i=1}^{n} (\hat{y}_i – \bar{y}_i)^2$

Degrees of freedom of SSM: $latex p-1$. An not very intuitive explanation is that when you are given $latex n$ data samples $latex (\vec{x}_1, y_1), \cdots, (\vec{x}_n, y_n)$, and you are given an SSM, then you can freely fluctuate up to $latex p-1$ data samples  and adjust the remaining $latex n-p+1$ data samples to make the fitted regression based on all the $latex n$ samples achieves the same SSM.  


The second row of the first table:

The sum square of error is defined as: $latex SSE=\sum\limits_{i=1}^{n} (\hat{y}_i – y_i)^2 $

Degrees of freedom of SSE: $latex n-p$


The third row of the first table:

The corrected sum square of total is defined as: $latex SST=\sum\limits_{i=1}^{n} (y_i – \bar{y}_i)^2$ 

Degrees of freedom of SST: $latex n-1$


F-value in the first row is the result of F-test, which tests whether your fitted linear regression is equal to a fit of intercept-only model. More details about F-test can be found in references. 

$latex Fvalue = \frac{MSM}{MSE}=\frac{\frac{SSM}{DF_{model}}}{\frac{SSE}{DF_{error}}} &s=2$ 

The p-value of F-value is obtained by looking up F-value table, which takes three parameters: F-value, degrees of freedom of numerator and degrees of freedom of denominator.


Reference:

[1] http://facweb.cs.depaul.edu/sjost/csc423/documents/f-test-reg.htm

[2] http://blog.minitab.com/blog/adventures-in-statistics/what-is-the-f-test-of-overall-significance-in-regression-analysis

Difference between SARSA and Q-learning

State-Action-Reward-State-Action (SARSA) and Q-learning are two forms of reinforcement learning. The difference of the two methods are discussed in:

  1. https://studywolf.wordpress.com/2013/07/01/reinforcement-learning-sarsa-vs-q-learning/
  2. http://stackoverflow.com/questions/6848828/reinforcement-learning-differences-between-qlearning-and-sarsatd
  3. http://stats.stackexchange.com/questions/184657/difference-between-off-policy-and-on-policy-learning

Let’s explain why Q-learning is called off-policy learning and SARSA is called on-policy learning. Suppose at state $latex s_t$, a method takes action $latex a_t$ which results to land in a new state $latex s_{t+1}$ with observed reward $latex r_{t+1}$. At state $latex s_{t+1}$, the next action $latex a_{t+1}$ is taken, which results in $latex s_{t+2}$…

For Q-learning, its update rule is:  $latex Q(s_t, a_t)=(1-\alpha) \cdot Q(s_t, a_t) + \alpha \cdot (r_{t+1} + \gamma \cdot \max_a Q(s_{t+1}, a))$

For SARSA, its update rule is: $latex Q(s_t, a_t)=(1-\alpha) \cdot Q(s_t, a_t) + \alpha \cdot (r_{t+1} + \gamma \cdot Q(s_{t+1}, a_{t+1})) $

I think the most intuitive way to differentiate on-policy and off-policy is to check whether the update formula depends on $latex a_{t+1}$. For Q-learning, it is called off-policy learning because no matter what $latex a_{t+1}$ is, the $latex \max_a Q(s_{t+1}, a)$ part is regardless of $latex a_{t+1}$. That is, $latex Q(s_t, a_t)$ gets updated regardless of future policy starting from $latex s_{t+1}$. On the other hand, SARSA is called on-policy learning because the part $latex Q(s_{t+1}, a_{t+1})$ in $latex Q(s_t, a_t)$ depends on the next actual action $latex a_{t+1}$.  

Another way to understand the difference between on-policy and off-policy is their estimation on $latex Q(s,a)$. When both SARSA and Q-learning use $latex \epsilon$-greedy policy to strike the balance between exploration and exploitation, they still have different estimations on $latex Q(s,a)$. Q-learning usually has more aggressive estimations, while SARSA usually has more conservative estimations. 

Below is a 3×3 grid showing the different behavior path learned from Q-learning and SARSA when:

  1. both methods adopt $latex \epsilon$-greedy policy.
  2. when tie happens, the action of going to right is preferred.
  3. some discount factor $latex \gamma < 1$ is used.

As you can see, Q-learning learns the faster path to the exit without caring the risk of falling off the cliff, i.e., the state-action pairs leading to the faster path have high $latex Q(s,a)$ estimations than the other longer, safer path. This is attributed to the max operator in Q-learning’s update formula: the max operator only tells you the best accumulative discounted reward you could get in the future regardless of danger. SARSA is like a  scrupulous person who avoids “dangerous zones” that is close to the cliff. This is because during the training, $latex Q(s,a)$ on the faster path are sometimes offset by the negative rewards due to falling into cliff. Therefore, $latex Q(s,a)$ on the longer, safer path, though discounted by more actions, are higher and more appealing.

rl (1)


Imagine if this environment has larger numbers of rows and columns and we still set the first row as cliffs except the two ends for entrance and exit. The path learned by SARSA may have different distances to the first row depending on the value of $latex \epsilon$ which governs the trade-off between exploration and exploitation and the value of $latex \gamma$ which controls the discounting level. The learned policy will be affected by training configuration. This is another reason why SARSA is called on-policy and Q-learning is called off-policy. 


Why the greedy algorithm of maximum weighted matching is a 2-approximation?

This post explains my understanding in a proposed greedy algorithm for the maximum weighted matching problem

The greedy algorithm goes as follows (listed by this paper in Introduction section):

Capture

It is claimed that the greedy algorithm is a 2 approximation, i.e., greedy result >= 1/2 optimal result.

The document where the greedy algorithm is proposed is erroneous therefore the proof for the 2 approximation is unreadable. Fortunately, another guy put his words to explain it: http://math.stackexchange.com/questions/1146224/proof-for-why-maximum-weight-matching-using-greedy-guarantees-at-least-1-2-the-w. However, I think further explanation is still needed to facilitate the understanding. Here is my thoughts:

If any edge $latex e$ belongs to the optimal matching $latex M^*$ but not the greedy matching $latex M$, it must be due to that at least one of its two vertices is incident on another edge $latex e’$ which is included in the greedy matching $latex M$. Due to the greedy algorithm, $latex w(e’) > w(e)$ otherwise the greedy algorithm could have selected $latex e$. Moreover, $latex e’ \in M \setminus M^*$ because, if $latex e’ \in M^*$, and we know $latex e \in M^*$, then $latex M^*$ contains two edges incident on the same node by contradiction.  

Each $latex e \in M^* \setminus M$ can be linked to an edge $latex e’ \in M \setminus M^*$ where $latex w(e’)>w(e)$. The same edge $latex e’$ can be counted at most twice if traversing all $latex e$ (maybe one endpoint of $latex e’$ touches an edge $latex e_1 \in M^* \setminus M$ and maybe the other endpoint of $latex e’$ touches another edge $latex e_2 \in M^* \setminus M$. ) Therefore, $latex \sum\limits_{e \in M^* \setminus M} w(e) < 2 * \sum\limits_{e’ \in M \setminus M^*} w(e’)$. We can also obtain trivially, under the assumption that all weights are positive, that $latex \sum\limits_{e \in M \cap M^*} w(e) < 2 * \sum\limits_{e \in M \cap M^*} w(e)$. Adding the two inequalities together, we get $latex \sum\limits_{e \in M^*} w(e) < 2 * \sum\limits_{e’ \in M} w(e’)$. 

The greedy algorithm is not applicable to maximum weighted perfect matching because it is not guaranteed to find perfect matching. (perfect matching: every vertex is incident on exactly one edge in the matching. ) Provided that we have the following inequalities:

optimal result for maximum weighted matching > optimal result for maximum weighted perfect matching

1/2 * optimal result for maximum weighted matching <= greedy result for maximum weighted matching

, we conclude that the greedy result for maximum weighted matching can loosely be used for maximum weighted perfect matching, if perfect matching is not strictly required. It is more appealing when the graph is a complete graph. In a complete graph, the greedy method returns a perfect matching.


The greedy algorithm takes $latex O(m\log m)$ to sort edge weights ($latex m=|E|$). In a complete graph where $latex m=n^2$ ($latex n=|V|$), the greedy algorithm takes $latex O(n^2 \log n)$, a little better than existing $latex O(n^3)$ methods (such as this) to solve maximum weighted perfect matching.  There is also an $latex 1-\epsilon$ approximation method running in $latex O(m \epsilon^{-1} \log \epsilon^{-1})$. However, the method is much more complicated.

Theano LSTM Code Walk Through

In this post, I am going to explain the code (as much as I can) from theano LSTM tutorial: http://deeplearning.net/tutorial/lstm.html

You need to first understand LSTM. Here is an online recommended material: http://colah.github.io/posts/2015-08-Understanding-LSTMs/, in which many beautiful figures are provided to illustrate LSTM step by step.

The tutorial aims to predict positive/negative sentiment based on movie reviews in texts. Essentially, it uses RNN with LSTM units to accomplish a supervised learning task. The basic idea is as follows:

  1. Use vectors to represent words and convert each review into a `num_words` $latex \times$ `word_emb_dim` matrix. Representing words as vectors is a technique called word embedding.   You can control your model complexity by flexibly setting the value of `word_emb_dim`. In the theano tutorial, the default `word_emb_dim` is set to 128. 
  2. It uses mini-batch for learning. Therefore, you need to assemble multiple review matrices from step 1 into a 3-dimension tensor, with the shape `num_samples` $latex \times$ `max_num_words` $latex \times$ `word_emb_dim`.  `max_num_words` is the max number of words among samples in mini-batch.
  3. It feeds the assembled mini-batch tensor into the RNN model. In RNN, the number of hidden units is by default set to 128, the same number of the default `word_emb_dim`. I am not sure whether it is a recommended practice to set the number of hidden units and the dimension of word embedding equal.
  4. After the tensor passes through the RNN, the model generates two tensors, one is stacked hidden unit vectors of the shape `num_samples` $latex \times$ `max_num_words` $latex \times$ `num_hidden_units`, the other is stacked memory cell output of the same shape. To go to the next step, we only need to keep the stacked hidden unit vectors.
  5. It applies mean pooling on the hidden unit outputs along the axis of words. Specifically, it calculates the mean of every component in the hidden unit vectors emitted by all the words in one review. Mean pooling results in a matrix of shape `num_samples` $latex \times$ `num_hidden_units`. It has one dimension less than the stacked hidden unit vectors from step 4, resulting from the mean pooling.
  6. Finally, the matrix from step 5 is fed into a logistic regression model. The number of LR weight aligns with `num_hidden_units`. The cost (objective function) is ultimately defined as a log likelihood function as usual logistic regression models do.  

Now, let’s look at the real code from the theano tutorial. In most cases I don’t modify the default parameters as provided. 

The main function as entrance:

if __name__ == '__main__':
    # See function train for all possible parameter and there definition.
    train_lstm(
        max_epochs=100,
        test_size=500,
    )

The core part of training `train_lstm`:

def train_lstm(
    dim_proj=128,  # word embeding dimension and LSTM number of hidden units.
    patience=10,  # Number of epoch to wait before early stop if no progress
    max_epochs=5000,  # The maximum number of epoch to run
    dispFreq=10,  # Display to stdout the training progress every N updates
    decay_c=0.,  # Weight decay for the classifier applied to the U weights.
    lrate=0.0001,  # Learning rate for sgd (not used for adadelta and rmsprop)
    n_words=10000,  # Vocabulary size
    optimizer=adadelta,  # sgd, adadelta and rmsprop available, sgd very hard to use, not recommanded (probably need momentum and decaying learning rate).
    encoder='lstm',  # TODO: can be removed must be lstm.
    saveto='lstm_model.npz',  # The best model will be saved there
    validFreq=370,  # Compute the validation error after this number of update.
    saveFreq=1110,  # Save the parameters after every saveFreq updates
    maxlen=100,  # Sequence longer then this get ignored
    batch_size=16,  # The batch size during training.
    valid_batch_size=64,  # The batch size used for validation/test set.
    dataset='imdb',

    # Parameter for extra option
    noise_std=0.,
    use_dropout=True,  # if False slightly faster, but worst test error
                       # This frequently need a bigger model.
    reload_model=None,  # Path to a saved model we want to start from.
    test_size=-1,  # If >0, we keep only this number of test example.
):

    # Model options
    model_options = locals().copy()
    print("model options", model_options)

    load_data, prepare_data = get_dataset(dataset)

    print('Loading data')
    train, valid, test = load_data(n_words=n_words, valid_portion=0.05,
                                   maxlen=maxlen)
    if test_size > 0:
        # The test set is sorted by size, but we want to keep random
        # size example.  So we must select a random selection of the
        # examples.
        idx = numpy.arange(len(test[0]))
        numpy.random.shuffle(idx)
        idx = idx[:test_size]
        test = ([test[0][n] for n in idx], [test[1][n] for n in idx])

    ydim = numpy.max(train[1]) + 1

    model_options['ydim'] = ydim

    print('Building model')
    # This create the initial parameters as numpy ndarrays.
    # Dict name (string) -> numpy ndarray
    params = init_params(model_options)

    if reload_model:
        load_params('lstm_model.npz', params)

    # This create Theano Shared Variable from the parameters.
    # Dict name (string) -> Theano Tensor Shared Variable
    # params and tparams have different copy of the weights.
    tparams = init_tparams(params)

    # use_noise is for dropout
    (use_noise, x, mask,
     y, f_pred_prob, f_pred, cost) = build_model(tparams, model_options)

    if decay_c > 0.:
        decay_c = theano.shared(numpy_floatX(decay_c), name='decay_c')
        weight_decay = 0.
        weight_decay += (tparams['U'] ** 2).sum()
        weight_decay *= decay_c
        cost += weight_decay

    f_cost = theano.function([x, mask, y], cost, name='f_cost')

    grads = tensor.grad(cost, wrt=list(tparams.values()))
    f_grad = theano.function([x, mask, y], grads, name='f_grad')

    lr = tensor.scalar(name='lr')
    f_grad_shared, f_update = optimizer(lr, tparams, grads,
                                        x, mask, y, cost)

    print('Optimization')

    kf_valid = get_minibatches_idx(len(valid[0]), valid_batch_size)
    kf_test = get_minibatches_idx(len(test[0]), valid_batch_size)

    print("%d train examples" % len(train[0]))
    print("%d valid examples" % len(valid[0]))
    print("%d test examples" % len(test[0]))

    history_errs = []
    best_p = None
    bad_count = 0

    if validFreq == -1:
        validFreq = len(train[0]) // batch_size
    if saveFreq == -1:
        saveFreq = len(train[0]) // batch_size

    uidx = 0  # the number of update done
    estop = False  # early stop
    start_time = time.time()
    try:
        for eidx in range(max_epochs):
            n_samples = 0

            # Get new shuffled index for the training set.
            kf = get_minibatches_idx(len(train[0]), batch_size, shuffle=True)

            for _, train_index in kf:
                uidx += 1
                use_noise.set_value(1.)

                # Select the random examples for this minibatch
                y = [train[1][t] for t in train_index]
                x = [train[0][t]for t in train_index]

                # Get the data in numpy.ndarray format
                # This swap the axis!
                # Return something of shape (minibatch maxlen, n samples)
                x, mask, y = prepare_data(x, y)
                n_samples += x.shape[1]

                cost = f_grad_shared(x, mask, y)
                f_update(lrate)

                if numpy.isnan(cost) or numpy.isinf(cost):
                    print('bad cost detected: ', cost)
                    return 1., 1., 1.

                if numpy.mod(uidx, dispFreq) == 0:
                    print('Epoch ', eidx, 'Update ', uidx, 'Cost ', cost)

                if saveto and numpy.mod(uidx, saveFreq) == 0:
                    print('Saving...')

                    if best_p is not None:
                        params = best_p
                    else:
                        params = unzip(tparams)
                    numpy.savez(saveto, history_errs=history_errs, **params)
                    pickle.dump(model_options, open('%s.pkl' % saveto, 'wb'), -1)
                    print('Done')

                if numpy.mod(uidx, validFreq) == 0:
                    use_noise.set_value(0.)
                    train_err = pred_error(f_pred, prepare_data, train, kf)
                    valid_err = pred_error(f_pred, prepare_data, valid,
                                           kf_valid)
                    test_err = pred_error(f_pred, prepare_data, test, kf_test)

                    history_errs.append([valid_err, test_err])

                    if (best_p is None or
                        valid_err <= numpy.array(history_errs)[:,
                                                               0].min()):

                        best_p = unzip(tparams)
                        bad_counter = 0

                    print( ('Train ', train_err, 'Valid ', valid_err,
                           'Test ', test_err) )

                    if (len(history_errs) > patience and
                        valid_err >= numpy.array(history_errs)[:-patience,
                                                               0].min()):
                        bad_counter += 1
                        if bad_counter > patience:
                            print('Early Stop!')
                            estop = True
                            break

            print('Seen %d samples' % n_samples)

            if estop:
                break

    except KeyboardInterrupt:
        print("Training interupted")

    end_time = time.time()
    if best_p is not None:
        zipp(best_p, tparams)
    else:
        best_p = unzip(tparams)

    use_noise.set_value(0.)
    kf_train_sorted = get_minibatches_idx(len(train[0]), batch_size)
    train_err = pred_error(f_pred, prepare_data, train, kf_train_sorted)
    valid_err = pred_error(f_pred, prepare_data, valid, kf_valid)
    test_err = pred_error(f_pred, prepare_data, test, kf_test)

    print( 'Train ', train_err, 'Valid ', valid_err, 'Test ', test_err )
    if saveto:
        numpy.savez(saveto, train_err=train_err,
                    valid_err=valid_err, test_err=test_err,
                    history_errs=history_errs, **best_p)
    print('The code run for %d epochs, with %f sec/epochs' % (
        (eidx + 1), (end_time - start_time) / (1. * (eidx + 1))))
    print( ('Training took %.1fs' %
            (end_time - start_time)), file=sys.stderr)
    return train_err, valid_err, test_err

line 61: initialize all the parameters to be learned as theano shared variable. I print out the shape information of each parameters (under the default setting):

Parameter name Note Shape
Wemb Word embedding. Every word is represented by a vector as a row (10000, 128)
lstm_W stacked weights involved in LSTM which connect input $latex X$: $latex W_i, W_f, W_o, W_c$. Stacking them for efficient learning as suggested in the tutorial. Each weight is a 128×128 square matrix.  
lstm_U stacked weights involved in LSTM which connect previous hidden units: $latex U_i, U_f, U_o, U_c$. Each weight is a 128×128 square matrix.  (128, 512)
lstm_b  the biases inside LSTM unit  (512,)
U The weights in the logistic regression. It contains two sets of weights, one for predicting positive and the other for negative   (128,2)
b  The biases in the logistic regression  (2,)


line 65: `build_model` is the crux part for building LSTM using theano.

def build_model(tparams, options):
    trng = RandomStreams(SEED)

    # Used for dropout.
    use_noise = theano.shared(numpy_floatX(0.))

    x = tensor.matrix('x', dtype='int64')
    mask = tensor.matrix('mask', dtype=config.floatX)
    y = tensor.vector('y', dtype='int64')

    n_timesteps = x.shape[0]
    n_samples = x.shape[1]

    emb = tparams['Wemb'][x.flatten()].reshape([n_timesteps,
                                                n_samples,
                                                options['dim_proj']])
    # proj = get_layer(options['encoder'])[1](tparams, emb, options,
    proj = lstm_layer(tparams, emb, options, mask=mask)
    # if options['encoder'] == 'lstm':
    proj = (proj * mask[:, :, None]).sum(axis=0)
    proj = proj / mask.sum(axis=0)[:, None]
        
    if options['use_dropout']:
        proj = dropout_layer(proj, use_noise, trng)

    pred = tensor.nnet.softmax(tensor.dot(proj, tparams['U']) + tparams['b'])

    f_pred_prob = theano.function([x, mask], pred, name='f_pred_prob')
    f_pred = theano.function([x, mask], pred.argmax(axis=1), name='f_pred')

    off = 1e-8
    if pred.dtype == 'float16':
        off = 1e-6

    cost = -tensor.log(pred[tensor.arange(n_samples), y] + off).mean()

    return use_noise, x, mask, y, f_pred_prob, f_pred, cost

line 14-16: assemble word embedding tensor in the shape `n_timesteps` $latex \times$ `n_samples` $latex \times$ `dim_proj`. `n_timesteps` corresponds to `max_num_words` in step 2 and `dim_proj` corresponds to `word_emb_dim`/`num_hidden_units`. Such name mapping persists onwards.

line 17-21: I commented out some lines from original code and modified them into more succinct expressions. 

line 18: `proj` is the stacked hidden unit vectors in the shape of  `n_timesteps` $latex \times$ `n_samples` $latex \times$ `dim_proj`. (The order of dimensions is different than we introduce in step 4.)

line 20-21: mean pooling from step 5. `mask` is a binary matrix of size `n_timesteps` $latex \times$ `n_samples`, of which 1 denotes a word exists.

Now let’s look at line 18 proj = lstm_layer(tparams, emb, options, mask=mask) :

def lstm_layer(tparams, state_below, options, mask=None):
    nsteps = state_below.shape[0]
    dim_proj = options['dim_proj']
    n_samples = state_below.shape[1]

    # if state_below.ndim == 3:
    # else:
    #    n_samples = 1

    assert mask is not None

    def _slice(_x, n, dim):
        # if _x.ndim == 3:
        #    return _x[:, :, n * dim:(n + 1) * dim]
        return _x[:, n * dim:(n + 1) * dim]

    def _step(m_, x_, h_, c_):
        preact = tensor.dot(h_, tparams['lstm_U'])
        preact += x_

        i = tensor.nnet.sigmoid(_slice(preact, 0, dim_proj))
        f = tensor.nnet.sigmoid(_slice(preact, 1, dim_proj))
        o = tensor.nnet.sigmoid(_slice(preact, 2, dim_proj))
        c = tensor.tanh(_slice(preact, 3, dim_proj))

        c = f * c_ + i * c
        c = m_[:, None] * c + (1. - m_)[:, None] * c_

        h = o * tensor.tanh(c)
        h = m_[:, None] * h + (1. - m_)[:, None] * h_

        return h, c

    state_below = (tensor.dot(state_below, tparams['lstm_W']) +
                   tparams['lstm_b'])

    rval, updates = theano.scan(_step,
                                sequences=[mask, state_below],
                                outputs_info=[tensor.alloc(numpy_floatX(0.),
                                                           n_samples,
                                                           dim_proj),
                                              tensor.alloc(numpy_floatX(0.),
                                                           n_samples,
                                                           dim_proj)],
                                name='lstm_layers',
                                n_steps=nsteps)

    return rval[0]  # hidden units outputs h: n_timesteps * n_samples * dim

lstm_layer uses `theano.scan` to loop through the input. It only returns `rval[0]` because the upper level logistic regression only needs hidden units’ outputs.
NLP datasets

  1. Twitter Sentiment Analysis: http://thinknook.com/twitter-sentiment-analysis-training-corpus-dataset-2012-09-22/
  2. Topic classification for news (including Reuters, NewsGroup): http://disi.unitn.it/moschitti/corpora.htm
  3. Movie reviews: http://www.cs.cornell.edu/People/pabo/movie-review-data/
  4. Other reviews: http://www.text-analytics101.com/2011/07/user-review-datasets_20.html
  5. Twitter Evaluation dataset: http://tweenator.com/index.php?page_id=13
  6. Amazon review: https://snap.stanford.edu/data/web-Amazon.html
  7. Amazon review (upon request): https://www.cs.uic.edu/~liub/FBS/sentiment-analysis.html
  8. opinmind: https://inclass.kaggle.com/c/si650winter11/data
  9. Large movie reviews: http://ai.stanford.edu/~amaas/data/sentiment/

Overview for Sequential Data Learning

Hidden Markov Model

You should bear in mind clearly the three questions people usually ask for Hidden Markov Model:

1. what is the probability of an observed sequence? 

2. what is the most likely series of states given a specific observed observation?

3. Given a set of observations, what are the values of the state transition probabilities and the output emission probabilities? 

ref:

http://cs229.stanford.edu/section/cs229-hmm.pdf

http://mlg.eng.cam.ac.uk/zoubin/papers/ijprai.pdf


Right way to put test codes in a Python project

I’ve been struggled about where to put test files in a python project for a long time. Ideally, I think it is succinct to create a folder called “test” with all test files in it. However, the test files nested in the test folder need to import modules from parent folder. It is troublesome to import Python module from parent directory as you can’t just use `import ../module`. Here are the two correct ways to put test files in the test folder nested in a Python project:

  1. don’t create __init__.py in the root directory. And use `nosetests` under the root directory: http://stackoverflow.com/questions/3073259/python-nose-import-error
  2. use a helper file to import parent directory to python path: http://stackoverflow.com/a/23386287/1758727 

Jupyter Parallelism Tutorial

In this post, I am going to introduce my favorite way to make cells in Jupyter notebook run in parallel.

1. Initialize cluster using command lines or use Python `popen` (In the example below, I create a cluster with 2 workers):

from subprocess import Popen
p = Popen(['ipcluster', 'start', '-n', '2'])

2. Then, programmatically set up the client. I usually set each worker non-blocking so that even when workers are running heavy tasks I can still do experiments in other cells:

from ipyparallel import Client
rc = Client()
dview = rc[:]
print "%d workers are running" % len(rc)

e0 = rc[0]
e0.block = False
e0.activate('0')
e1 = rc[1]
e1.block = False
e1.activate('1')

3. Then, to run one cell, add the magic command `%px0` at the first line of the cell. Here `0` means you designate the cell to be run on the first worker. You can replace `0` with any number as long as it is within the number of your workers. Here is one example:

%%px1
# An example of asynchronous parallelism 
print len(df)
import time
c = 0
print time.time()
while c < 3:
    time.sleep(3)
    c += 1
print time.time()

4. You can think each cell starting with `%px[num]` as an independent workspace. Therefore, you need to explicitly import modules or data objects you want to use within the parallel cells. For example, in the example above, I must write `import time` in order to use the `time` module in the cell. The alternative is to import module/data programmatically:

# push data to all workers. the passing objects must be in a dict form.
dview.push({'churn':churn, 'data_end_date':data_end_date, 'CHURN_INT':CHURN_INT})

# import any modules you want
with dview.sync_imports():
    import sys

5. Finally, to get results, use `%pxresult0` (Similarly, you can replace `0` with other number denoting specific worker.)

%pxresult0

Note that `%pxresult0` is blocking if the result has not come out yet. If you want to do experiments in other cells, don’t run `%pxresult0` too early.


Reference:

http://minrk.github.io/drop/nbconverttest.html

https://ipython.org/ipython-doc/3/parallel/magics.html (for old ipython notebook)

http://ipyparallel.readthedocs.io/en/latest/ (for jupyter)